
Professional alignment requires equipment most home garages do not have, but drivers can perform meaningful checks that reveal whether something is wrong long before the shop visit. These home checks will not produce calibrated measurements, but they catch the kinds of obvious problems that cost tires their lives, and they let the driver have a more informed conversation with the technician about what to look for.
The straight-road test is the simplest and most useful. Find a quiet, flat, straight stretch of road with no crown or camber. Get the vehicle up to a normal driving speed, ease pressure on the steering wheel until the hands are barely touching, and observe what happens. A correctly aligned vehicle on a flat road tracks straight or drifts ever so slightly with road slope. A misaligned vehicle pulls noticeably to one side or wanders. The amount of compensation needed at the wheel is the first clue. Repeat the test on a different road in the opposite direction to rule out road crown bias.
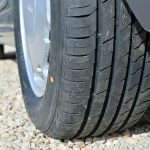
The tire wear inspection is the next step. With the vehicle parked on level ground, examine each tire carefully. Run a hand across the tread in both directions. Tread that feels smooth one way and sharp the other indicates feathered wear from a toe error. Look at the inner and outer edges; a clear difference in remaining tread depth between the two edges of the same tire indicates camber issues. Compare tire to tire across an axle; if the left front shows different wear than the right front, alignment is likely uneven side to side. The wear patterns tell more than any single measurement because they integrate weeks or months of driving.
The tread depth check using a depth gauge gives quantitative data. Measure each tire at the inner edge, the center, and the outer edge. Record the numbers. A gap of more than two thirty-seconds between any two zones on the same tire is a clear sign of alignment trouble. Measuring all four corners and tracking the readings over time creates a record that helps decide when to act.
The string test is a classic backyard alignment check that surprised many drivers with its accuracy. Stretch a string from the front of the vehicle to the rear, parallel to the centerline of the body, just touching the rear tire sidewall at its widest point. Measure the distance from the string to the front tire sidewall at the front and rear edges of the front tire. The difference is the toe of that front wheel. Repeat on the other side. The string test cannot match a laser alignment rack, but it will identify a wheel that is significantly out of toe and will confirm whether the front is severely misaligned.
A simple level placed against the wheel tells a rough story about camber. With the vehicle on flat ground and the steering centered, hold a digital level vertically against the wheel itself and read the angle. Most passenger cars run between zero and one degree of negative camber up front, and slightly less at the rear. A reading of two or three degrees is suspicious, especially if it differs side to side. This will not replace a real alignment measurement, but a dramatic asymmetry between sides flags a problem worth investigating.
Visual inspection of suspension components is worth the time. With the vehicle on a level surface and ideally raised on jack stands, look at tie rods, ball joints, control arm bushings, sway bar end links, and strut mounts. Cracked rubber, leaking fluid from struts, visible play when grabbing components and rocking them, or torn boots all indicate problems that will affect alignment regardless of what an alignment rack reports. A worn ball joint will measure within specification on the rack and then go out of specification within weeks of driving because the joint has play.
Checking ride height left to right is informative. Measure from a fixed point on the body, such as the bottom of a fender lip, down to the ground at all four corners. Differences greater than half an inch between sides, or larger than expected between front and rear, indicate sagging springs. Old coil springs lose height over time, and once one side sags, the alignment angles change with it. No alignment shop can fix a car with collapsed springs; the springs must be replaced first.
The walk-around inspection includes checking for loose lug nuts with a torque wrench, looking for embedded objects in the tread, and feeling for unusual heat or play at any wheel after a drive. Any heat at one wheel that is not present at the others indicates a brake issue that will distort the alignment readings until fixed.
Documenting all of these observations, taking photos of wear patterns, and writing down the symptoms creates a useful package to present at the alignment shop. Technicians appreciate informed customers, and they can target their inspection more efficiently when handed specific data points instead of vague complaints. Some shops will perform a measurement check at no charge if the customer wants to confirm that an alignment is needed before authorizing the work.
Home checks build awareness. They train the driver to notice changes early and to tell the difference between alignment problems and the many other things that can affect handling. They cannot replace a proper alignment service, but they make every alignment service more effective and every dollar spent on maintenance more productive.